"Exposure" refers most properly to the amount of light that you allow to enter through your camera lens for a given shot.
Generally, a properly exposed shot is one that corresponds as closely as possible to what the human eye sees. Here are examples, left to right, of an underexposed shot (too little light let in, therefore too dark), an overexposed shot (too much light let in, therefore washed out or blown out), and a properly exposed shot (ah, just right!)

The exposure is controlled (either automatically or manually) by two factors: how wide you open the shutter (aperture) and how long you keep it open (shutter speed). The aperture and the shutter speed
together control how much light you allow to enter your camera.
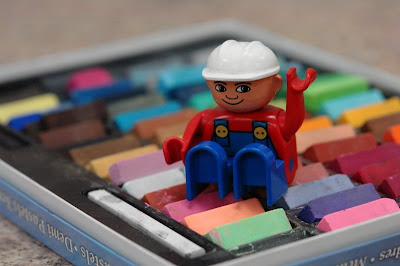
For instance, here are three shots that have close to an equal exposure. Beneath each shot are the aperture and shutter speed settings. Aperture is measured in a number called the F-stop. (Technically the F-stop is the focal length divided by the diameter of the lens, but most people don't need to know that. If you do want to know more click
here.) F-stops on most cameras tend to range from f/2.8 - 16. The larger the number, the smaller the aperture. For instance f/2.8 is a
wider aperture (and lets in more light in the same amount of time) than f/16. Shutter speed is measured in fractions of a second or, for longer exposures, in seconds.

f/16...............1/3 sec

f/11...............1/6sec

f/4.8...............1/30sec
The lens of the camera was open for 1/3 of a second in the top shot and 1/30 of a second in the bottom shot but because of the different aperture settings, the same
amount of light got through the lens to the sensor (or film, in a film camera).
Think of it as you would a hole in the bottom of a bucket, over which you have placed your finger. Say you want to spill exactly a cup of water onto the floor. If the hole is a very tiny hole, you need to remove your finger for quite some time while a cup of water slowly drips out. If, on the other hand, the hole in the bucket is large, you will have to remove your finger for a much shorter period of time.
In most cases, you want enough light to enter the camera to result in a proper exposure. When your camera is set control exposure
automatically, it makes determinations for you based upon its own metering system, and usually provides you with the widest aperture available in order to give you the fastest shutter speed. It does this because most of the times people are a picture they want the picture to be properly exposed and they want to have as little chance as possible of your shot being ruined by a shaky hand.
However, there several circumstances under which you want to have control over the total exposure of the shot and others where you want to control the ratio of aperture to shutter speed in determining the exposure.
Let's begin with the times when you would want to have control over the total exposure of the shot and save the precise understanding aperture and shutter speed as well as their creative use for later tutorials. (For a
preview, however, go back and look at the differences in the three properly exposed shots of the Lego figure on the box of pastels. Notice anything?)
First of all, there are times when you know the shot you are taking is in low light and you want the picture to come out
looking like it was in low light. Most cameras can't make this distinction, so they automatically assume that you want the shot to be exposed as if the scene were fully lit.
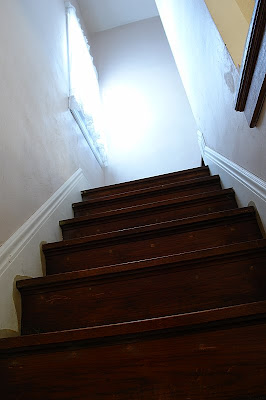
Consider this picture of a stairwell. The camera automatically
assumed a normally lit scene and overexposed the image.
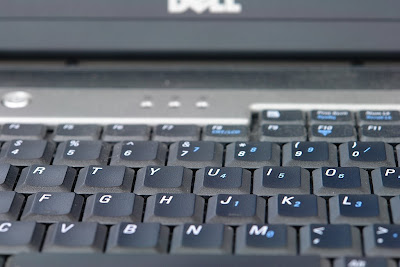
Secondly, even when working in full light, your camera assumes that you are taking pictures of a scene with an average amount of light and dark objects. So when you are shooting an object that is either very dark (like a black cat) or very light (like a snow scene) the camera is unlikely to expose the shot properly.
Consider the way my camera's automatic exposure handled this tight shot of the black laptop keyboard:
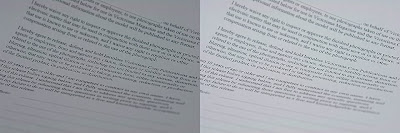
Or the way it handled a white sheet of paper.
Notice how both are 'greyer' and nastier than they should be, but in opposite directions. So using automatic exposure doesn't always work. In the first case, the shot is too light. In the second case, the shot is too dark. In order to get the results you want under these circumstances, there are several ways of taking greater control of the exposure.

First, many cameras give you the ability to compensate for the over or underexposure by using "Exposure Compensation" or "EV Compensation." Most mid-range to higher-end cameras and even some simple point-and-shoots come with exposure compensation, either as a dial on the camera or a menu item. Look for the icon to the right on your camera, on your menu, or in your user's manual.
Most cameras will allow you to adjust the exposure in increments of +/- 0.5 or 0.3, where a compensation of +/- 1.0 is equivalent to either doubling the amount of light you allow in or cutting it in half.
This was the method I used to adjust the over or underexposed shots above and here are the results side by side. The one I did not use exposure compensation on (0EV) is on the left and the one I did use exposure compensation on, with the amount I compensated, is on the right.
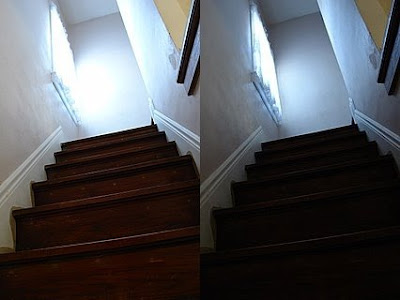
0EV....................-1.3EV

0EV .................... -1.0EV
0EV .................... +1.0EV
(I think I could easily have gone +1.3EV or even +1.7EV with the paper, which just goes to show how off your automatic metering can be under these conditions.)

The second way of taking control is to use "spot metering", a feature you will find, again, on most mid-range and high-end cameras as well as some point-and-shoot models. The spot metering icon on most cameras these days looks something like the one to the right.
Spot metering changes the camera's automatic exposure systems so that it only reads a particular spot when adjusting the exposure. The spot metering allows you to choose a particularly dark or particularly bright location in your photo and allow enough light in to properly expose
that particular spot without respect to anything else in the scene. This keeps the camera from doing its metering on the basis of an average. This comes in handy sometimes in areas of strong light or shadow or when a subject is against a very dark or light background. Consider the three shots below. The first was taken with the regular metering and the second two with spot metering.
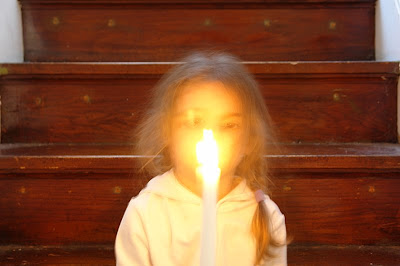
automatic exposure
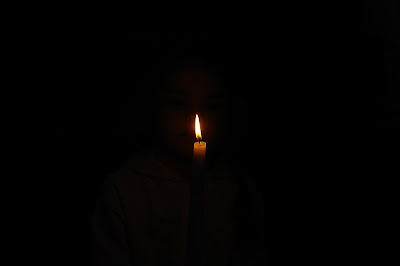
spot metered on the flame
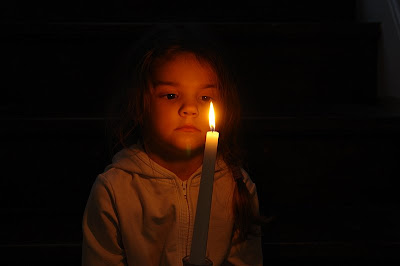
spot metered on the candle just below the flame
The final way to adjust exposure is to use your camera's manual settings and adjust both the aperture and shutter speed yourself. I recommend starting with an automatic setting, switching your camera to its manual setting, and then playing around and learning by trial and error. If you want another starting place, you can try working with an
exposure table.
The final thing you need to understand about basic exposure is the role of ISO. For film cameras, there are different "speeds" of film typically ranging from the slower 100 to the faster 400. Special films ranged from 50 to 32000. The "speed" here refers to the sensitivity to light of the chemicals used in the film. A 100 speed film would take longer to 'receive' an image and therefore you would have to expose the film to light longer in order to get the right exposure. A faster film would receive the image faster.
Though the technology is very different, this system and these numbers have been transferred roughly to the settings of a digital camera's CMOS or CCD sensor (the digital soul of the camera).
Below you can see the effect of change the ISO on the proper exposure. Each shot was taken with an f/4.8 aperture. Notice how as the ISO rises, the shutter speed falls.

ISO 160 ............... 1/13 sec

ISO 400 ............... 1/30 sec

ISO 800 ............... 1/50 sec
ISO 1600 ............. 1/100 sec

ISO 3200 ............. 1/200 sec
At ISO 3200 you can shoot at 1/200 of a second even in low light!
So why not
always shoot at a high ISO?
Because that speed and sensitivity comes at a cost. Compare these three close ups (1:1 crops).

ISO 160 ............... 1/13 sec

ISO 800 ............... 1/50 sec

ISO 3200 ............. 1/200 sec
The image degradation you see with the higher speed settings is called "noise" in digital images. There are a couple of really good noise reduction softwares out there, including my favorite, the absolutely free
Noiseware Community Edition Standalone. But even with that software you face image degradation when you choose a higher ISO. (And most cameras mid-range or point-and-shoot cameras will perform worse than what I have just shown you.)
So when you work with exposure, you need to be aware of how the automatic exposure works on your camera, what you can do with aperture, shutter speed, and exposure compensation, and how these are impacted by the ISO setting you choose.
In upcoming tutorials, look for tips on how to even more creatively use your aperture and shutter speed settings!


.jpg)


